Yoga Pose:
Pasasana
Important Note
Take special precautions while doing any asana. If you are learning yoga, then take the advice of a knowledgeable person. Do not put any kind of force in the event of pain or unable to do so. Keep in mind that you will be able to succeed only with constant practice.
Brief Introduction Of The Pasasana
- The Pasasana is also commonly called as the noose pose in the modern world. People around the world practice this asana and also call it as a snare pose in some parts of the world. History says that this particular pose has changed over a period of time.
- It is not a completely seated pose and there are people who refer Pasha also as one of the many names of their Lord Shiva. This pose belongs to the intermediate level and requires a certain flexibility aspect before it could be mastered by people.
How To Do The Pasasana?
- Beginners may not find it easy as mentioned above and may require a certain level of practice before they are able to master it. Although there are many variations to the Pasasana we look at the one that is simpler to follow and adhere to.
- Like many asanas people choose to use a folded fabric or a yoga mat to practice this asana. This is because they are not seated or standing and fall in the category where they are in-between the two stages. The steps that you can follow to practice Pasasana are:
- Standing in the mountain pose or Tadasana as it is traditionally called would be the ideal start for anyone about to try getting into Pasasana. However, for this specific pose you may want to stand next to a wall for best results. The distance between you and the wall should be ideally equivalent to your forearm. The wall should be to your right side of the body.
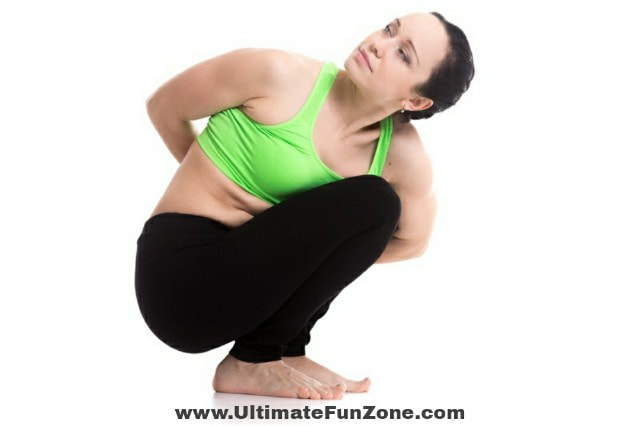
- As far as your standing position goes you should have about the width of your hip space between your legs as they are spread apart. Now, from this position you should perform a full squat.
- Your buttocks should be touching your heels and the heels in turn should be touching the ground. For some people the heels touching the ground may not be physically possible due to their low flexibility levels. These people can choose to use a sandbag or a folded blanked at their heels so as to attain maximum comfort.
- You should now begin the process of exhaling while you slightly swing both of your knees to the left side of your body. In the next motion you should try to turn your torso to the right side while your arms are pressing against the wall that is close to you.
- Ideally, your left elbow should be pressed against the right knee when you are in this position. Your right hand can be used as support for the body as well as for leverage purposes. In this position your left hand of yours would be lower than the right hand when you are in this pose.
- If there is any sort of space that is left between your thighs and the left side of your torso it should be closed. This happens usually when the full pose is attained.
- Now your shoulder or arm and the knee should be pressed as firmly as possible against each other. You should try to keep your belly soft as it may tend to turn hard as you progress in this pose.
- Now for the last part you would have to continue to keep your right hand on the wall while the elbows are angled away from one another in a sharp pose. The pressure gained out of this pose can be used to further twist your body to the maximum.
- Now you can choose to stay in the final pose for up to a maximum of 1 minute if you can. Beginners may choose to stay for about 30 seconds maximum or lesser depending on their comfort levels.
- To release the pose you would have to gently release the twist while you also exhale slowly to make the process smooth. You can follow these steps from 1 – 10 on the other side of your body to complete the Pasasana.
These are steps that are formed by yoga gurus and instructors to make things easier for people practicing the Pasasana. So, it is imperative that anyone trying this asana should ensure that they follow the set pattern so as to ensure they are doing the asana right.
Benefits Of The Pasasana
If you are successful in practicing the Pasasana properly in accordance to the steps mentioned above you would be able to enjoy a variety of benefits. Although there are many benefits associated with this asana, we list out the most common ones for you below.
- People who suffer from mild shoulder, back, and neck tensions may take up this asana to attain relief with the same.
- If you are a person suffering from indigestion the Pasasana can help you overcome it with ease when practiced regularly.
- Asthma, sciatica, and menstrual discomfort are some of the other things that this asana can help you with too.
Precautions To Be Taken While Doing The Pasasana
In order to attain the benefits of the Pasasana you would have to ensure that you are doing it right. If you are not aware of the precautions there are chances of you injuring yourself while practicing this asana. Some of the common precautions are as follows:
- Do the Pasasana only on an empty stomach. If you are practicing this asana in the evening you might want to ensure that you have given a 4 – 6-hour break from your last meal.
- You should ensure that you do not over stretch yourself or try too hard to perfect this asana. It would harm your muscles and may end up in you having a sprain or other discomforting issues.
- Anyone suffering from lower back injuries should not practice this asana. Also applicable for people with spondylitis and arthritis.
Conclusion
- If you are not certain about your body condition being fit for Pasasana you should consult your general physician.
- Talking to a yoga instructor or yoga guru may also help you attain perfection with the Pahasana.
- It is better to practice caution when you stretch yourself.
Share This Page On...