Yoga Pose:
Parsvakonasana
Important Note
Take special precautions while doing any asana. If you are learning yoga, then take the advice of a knowledgeable person. Do not put any kind of force in the event of pain or unable to do so. Keep in mind that you will be able to succeed only with constant practice.
Brief Introduction Of The Parsvakonasana
- The Parsvakonasana is also commonly known as the side angle pose or the extended side angle pose. This asana is used both in modern and traditional asana by people. Practicing this asana has many benefits when it is done in the right manner.
- This asana belongs to the basic level of the asanas and should be easier for beginners to master if the steps are followed right. There are various variations to this pose that you might wish to try once you master the basic one given below.
- You can choose to use preparatory poses and follow – up poses to make things a lot easier for you as a beginner. Various parts of the body are benefited along with the mind with this asana that you may want to practice on a regular basis.
How To Do The Parsvakonasana?
- You may not necessarily require a yoga mat or fabric to practice this asana. However, if you are on a slippery surface having one would help you attain balance and control. Practicing this asana indoors in a ventilated room is a good option.
- Your abdomen, legs, spine, ankles, shoulders, groin, lungs, and chest muscles are some of the areas this asana works on. You would find the steps mentioned below as one of the easiest ways in which you can practice Parshvakonasana to begin with.
- You can begin with Parsvakonasana by standing either on a yoga mat or on a plain surface. It may be a good idea to get into the mountain pose or Tandasana for most people. Try and keep a tab on your breathing and make sure it is not fast paced.
- Now, you can keep both of your feet apart from each other. A good 3 – 4 feet of gap between them is suggested to get the balance right. Once in this position you can choose to swing your arms out towards the side.
- Keep your chest up while you are stretching both your arms and legs. This can warm you up for the stretches that is coming up in a few steps. At this point you can breathe as normally as you always do without fussing about it too much.
- Your left foot should now be slowly turned towards the inside while your right turns towards the outside. Now, your knees should be bent in such a way that they form a square. At the same time, you can exhale to make things easier.
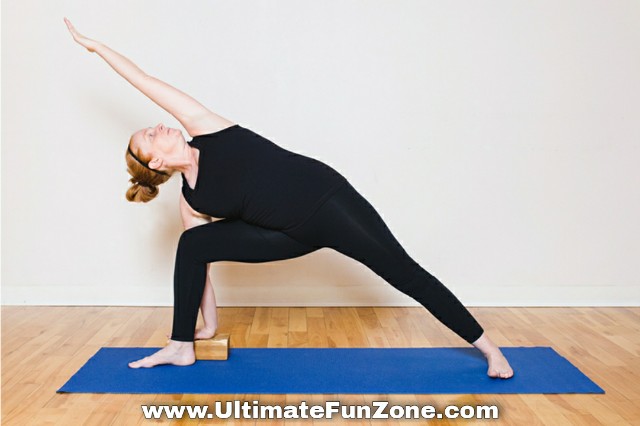
- By now your thigh should be parallel to the yoga mat while your shin is in an upright position. Now you can proceed to place the right hand in a position that is outside of your right leg.
- Keeping your palm faced downwards you can have your left arm extended upwards. While doing this you should also make sure your tailbone is moving in an inward position.
- Your right knee should be pressed back in such a way that it begins to align right above your right ankle. While doing this your left leg should be placed very firmly on the floor so as to attain the right balance.
- Now you can proceed to extend your left hand feeling the stretch that runs along entirely to the right side of your body. Your arms should now be stretched in such a way that they are close to your ear while you look up towards the ceiling.
- Ideally, once you attain this position you are advised to hold on to it for up to 30 seconds as a beginner before you opt to release. While releasing you should come back to your standing position from where you began at first.
- Now, you can move on to the opposite direction or the other leg and follow steps from 1 – 9. Ensure that you are not mixing up the steps and avoid getting into a tangle.
Careful adherence to the steps mentioned above are very important to you. This is especially the case if you are beginner with practicing yoga asanas for the first time. Parsvakonasana can also be an ideal asana to begin your day.
Benefits Of The Parsvakonasana
Parsvakonasana like all asanas help your body, mind, and soul by providing you many benefits. We look at a few of the most important benefits that you can attain by practicing this asana on a regular basis. They are as follows:
- If you are a person wishing to strengthen your knees, legs, and ankles then this asana is the right one for you.
- Your abdominal organs get stimulated and for women it also helps regulate their menstrual cycle.
- Acidity and constipation are also addressed for people who suffer from these conditions.
- Overall digestion of your body is said to increase a great deal as it helps with the metabolism of the body.
- If you are a person who is concerned with the fat percentage in your body then you can practice this asana to get rid of the same.
- The overall stamina of your body increases a great deal too for people practicing the Parshvakonasana.
Precautions To Be Taken While Doing The Parsvakonasana
Getting to know the precautions is important to ensure that you are not putting your body at risk while practicing the Parsvakonasana. It would also help you avoid injury since you would be doing stretches and balancing your body in the pose. Some precautions are:
- Do not practice this asana if you are suffering from hypertension, neck pain, back pain, headaches, insomnia, or spondylitis.
- Never practice this yoga immediately after food as it requires a minimum of 4 – 6 hours from the time you had food before you can get into it.
- Do not make any swift movements of the body as it might end up risking serious injuries by doing so.
Conclusion
- Taking into consideration your current health condition before you practice the Parsvakonasana should be a good idea.
- You can consult with your doctor, yoga guru, or trained professionals to get an opinion on how to start this asana the right way.
Share This Page On...