Yoga Pose:
Parighasana
Important Note
Take special precautions while doing any asana. If you are learning yoga, then take the advice of a knowledgeable person. Do not put any kind of force in the event of pain or unable to do so. Keep in mind that you will be able to succeed only with constant practice.
Brief Introduction Of The Parighasana
- The Parighasana is commonly known in modern terms as the gate pose. The literal translation from Sanskrit is also said to mean crossbar or gate. This is also a yoga asana that was practiced in its traditional form as well as now in modern yoga.
- Although there are not many details available about how long back this asana was found there are enough indications for people to practice it regularly these days. There are said to be a few variations for the Parighasana but we look at the one that is easy to master.
- Some people may find this asana a little difficult to master. However, this belongs to the category of a beginner and with these simple steps can be mastered with ease. The inner part of your thigh and the sides of your body are said to be the most benefited.
How To Do The Parighasana?
- Since the Parighasana is also something that is usually practiced on the floor you might want to use a comforting fabric that is folded. Alternatively, you might also use the yoga mat or any mat that you might feel comfortable with.
- Moreover, the fabric or mat would also help since you would be partially kneeling while you are practicing this asana. A flat surface is vital to ensure that you are able to keep injuries at bay while practicing this asana regularly. The basic steps to be followed are below:
- You can begin with kneeling on the mat or fabric in a comfortable position with your toes being curled underneath. This would ensure that you are in a stable position. If this is not a comfortable position you can choose to keep, you’re the top of your toes faced towards the ground while you are kneeling.
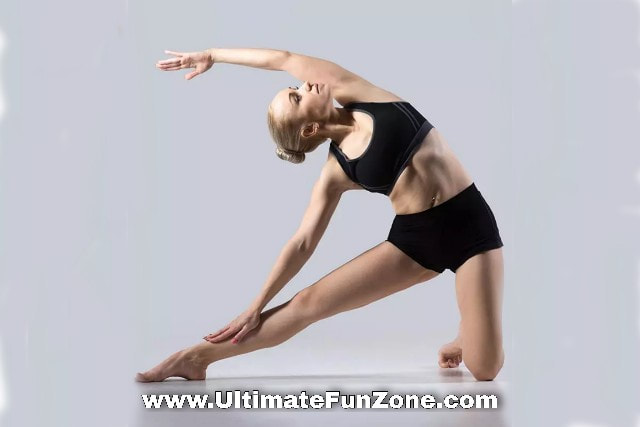
- Slowly you can stretch your right leg to your right side of the body. At the same time, you can also move your hip or twist it towards the outside too. This way you would have the knees facing the ceiling of the room with toes pointed upward.
- Your position should be such that the knee you are kneeling on should be right below your hip. On the other hand, the right leg that is moved away from the body should be on the same line as the knee that is kneeling.
- Now you can begin inhaling while you have your left arm stretched over your head. The stretched hand should be close to your ear and in a straight line. It is ideal if the blade of your shoulder is pressed against the back of your body.
- You should now begin to exhale while your right hand slowly moves towards your extended right leg. You can begin to rest your right hand either on your toes, knees or thighs according to your comfort levels.
- Outstretch your neck as much as you can without straining it too much. You should now be able to face the ceiling of your roof in the room you are practicing. In this pose you should have the right balance to avoid injury.
- You can now begin to breathe deep and not move from this pose. Holding this pose can be tricky when it comes to the balance of your body. However, as time goes by you should be able to master it.
- While you try to release from this pose you should begin to inhale deeply. Slowly you can draw your right thigh close to the left while you lift up and pull your belly inside.
- Now you can exhale while you stretch your leg and come back to the normal position. You can now repeat the steps from 1 – 8 to do the Parighasana on your other leg.
Practicing these steps steadily and slowly is the key to attain the perfect balance that is required for the Parighasana. In order to attain the best benefits of this asana you might want to sit in a room that is well ventilated to make breathing easier and comfortable.
Benefits Of The Parighasana
It is imperative that you get to understand the benefits that is involved in practicing the Parighasana. These benefits include the ones to your body and mind to a great extent. The best of benefits you attain are as follows:
- Your respiratory system gets strengthened with regular practice of the Parighasana.
- This pose helps stretch the calves, torso, hamstrings, and adductor muscles to a good extent.
- The abdominal organs and lungs are stimulated properly when you practice this asana. Moreover, the intercostal muscles that are positioned between your ribs also get a good stretch.
- Your muscles in the back of your body also get a good stretch making them flexible.
Precautions To Be Taken While Doing The Parighasana
A few precautions are necessary when you practice Parighasana or any asana. Without adhering to these precautions, you are likely to risk an injury that you might not want. We list a few things that you should be aware of when it comes to Parighasana.
- Anyone who is having a knee injury or a condition to do with the knee should avoid practicing this asana. Alternatively, they can choose to sit in a chair rather than kneeling down on the floor to practice this asana.
- You might feel dizzy while you look up during the asana. In this case you might want to rather focus on keeping your eyes still on something that is straight ahead of you rather than looking up towards the ceiling.
- While in this position you might not want to put your body weight on your knee or thighs on the leg that is extended outward.
- Avoid dropping your chest and always keep it open for best results.
Conclusion
If you are person who has any underlying health conditions you might want to take medical advice before you practice Parighasana. Practicing this asana on a regular basis is very important if you were to attain the full benefits of the Parighasana.
Share This Page On...