Yoga Pose:
Mandukasana
Important Note
Take special precautions while doing any asana. If you are learning yoga, then take the advice of a knowledgeable person. Do not put any kind of force in the event of pain or unable to do so. Keep in mind that you will be able to succeed only with constant practice.
Brief Introduction Of The Mandukasana
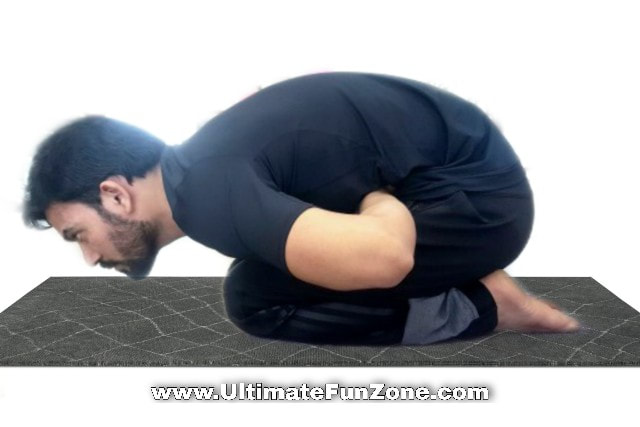
- The Mandukasana is commonly used both in haltha and modern yoga. Like most of the other asanas in yoga this has a set of unique advantages that helps different parts of your body. Frog pose is how this asana is known where Manduk means frog.
- Yoga gurus, teachers, and instructors usually advise people to use certain preparatory poses. They include Balasana (Child Pose), Vajrasana (Thunderbolt Pose), and Baddha Konasana (Bound Angle Pose).
How To Do The Mandukasana?
- This is one of the few asanas that you can choose to do as a beginner with not much experience with yoga asanas. People usually find no difficulty in doing Mandukasana due to the ease at which you can practice it.
- There are apparently two different ways in which you can practice this asana known as frog pose or Mandukasana. First, we look at the simpler method to do Mandukasana and then we move on to the one which is slightly different but not difficult.
Method 1
- Use a yoga mat or any mat that is comfortable to sit on the floor. You might want to ideally use the preparatory pose for this and Vajrasana is the best way to start. You can sit comfortably in this position before you go on to the next step.
- Your right palm should be placed on the left which should then be placed on your naval. This position should be maintained until you are completed with the Mandukasana.
- Using your palm it is advised that you should begin pressing your stomach inwards. While you press your stomach, you do not have to necessarily inhale or exhale as this process comes in the next step.
- Now from this position you should keep looking forward or straight. Gently bend forward with your eyes following your movement forward and down. While you do this, you should exhale and continue until you reach to see the floor or mat.
- Once you reach the maximum forward movement towards the floor you should keep still and hold your breath. In this position your chest would ideally be touching your knees while your eyes are on the floor.
- You can retract to the position where you started while inhaling. This is a slow and steady process that should not be rushed by any means. It would ensure that you are doing the Mandukasana right.
- You can repeat from Step 1 – Step 6 anywhere between 3 – 4 times depending on how comfortable you are with the Mandukasana.
Method 2
You would notice that the method 1 and 2 are very similar with minor changes. Beginning with the 1st method and then choosing the method 2 may be a better choice for people who are beginners with Mandukasana.
- Like the method 1 you would begin with using a yoga mat or any type of mat that you find comfortable to sit on. Get to the Vajrasana as a preparatory pose and sit on the floor with a mat used for comfort.
- Rather than placing your right palm on your left you would be clenching your fists in this method. Your thumb should be ideally placed inside the fingers to ensure that you attain the maximum benefit out of Mandukasana in this method.
- You should begin to press your fists that are clenched against your naval like in the 1st method. It may be better if you press it against your naval a little for better results with this yoga asana.
- Now you should exhale and move forward with your head moving along with your body until you face the floor. This is done by you bending forward while in the same position.
- You can continue to hold this position for as long as you comfortably can. This duration of staying in this position can vary from one person to another. You should hold your breath and not inhale while in this position.
- Once you are ready to retract you can begin the process of inhaling while you come back to the sitting position. Again, this is something you would have to do it slow and steady.
- You can choose to repeat from step 1 – step 6 between 3 – 4 times.
It is imperative that you follow either of these two methods and not otherwise. In case you deviate from these steps the chances of you sustaining an injury are relatively high. Many people consider both the methods easy and alternate between the two.
Benefits Of The Mandukasana
Below are some of the best benefits that you can get with practicing Mandukasana. Like all yoga asanas this too comes with benefits aplenty when you practice it no a regular basis at home or at your gym.
- The general insulin in the body tends to increase thus helping cure diabetes.
- Cardiovascular diseases, problems related to your stomach, and reducing fat in your hips and thighs are other advantages of Mandukasana.
- You also get added flexibility on your legs and thighs.
- Pain relief in your ankles, back, and knee are also attained with this asana.
- Excretory system and digestive system begin to function better.
Precautions To Be Taken While Doing The Mandukasana
Like all asanas this one has a set of precautions to follow too and they are as follows:
- Anyone with backpain or ulcers should not try to practice this asana.
- People suffering from knee injuries are also advised not to practice this asana as it might aggravate the condition.
- If you are a person suffering from insomnia or high blood pressure you might want to keep away from practicing Mandukasana.
Conclusion
- Any asana including the Mandukasana should only be practiced after consulting with your general physician or a yoga expert. People who are suffering from certain health conditions may not be advised to practice this asana.
- Moreover, it might always be a good choice to consult with yoga gurus, yoga teachers, or an instructor when you have doubts about the Mandukasana. The more you practice this asana you would begin reaping the health benefits associated with it.
Share This Page On...