Yoga Pose:
Hanumanasana
Important Note
Take special precautions while doing any asana. If you are learning yoga, then take the advice of a knowledgeable person. Do not put any kind of force in the event of pain or unable to do so. Keep in mind that you will be able to succeed only with constant practice.
Brief Introduction Of The Hanumanasana
- Getting your body, mind, and soul to work in order is not as easy as it sounds. However, in the ancient times people practiced yoga asanas that helped them achieve this without too much trouble at all. There are many asanas that in total comprise of the yoga asanas.
- Although some of the asanas are very easy to practice there are the others that are very difficult. However, with regular practice you can master them over a period of time. In this article we look at hanumanasana.
- We see below how this asana is done, the benefits that come along with it and the precautions that you need to take while practicing it. It would allow you to ensure that you do not make mistakes while practicing this asana in real time.
How To Do The Hanumanasana?
- The hanumanasana is also referred to as monkey pose in the modern era. However, it does not have any resemblance to the poses that monkeys are used to. It is derived from the pose the Hindu God Hanuman practiced.
- Legend has it that Hanuman stretched from the southern part of India to Sri Lanka with his legs split. This is where the name comes from and is considered one of the difficult of poses to perfect in the yoga asanas.
- In this pose the legs are split both backward and forward and is said to be the biggest leap ever. It is considered safe to practice this pose as a beginner with blankets to support your back knee as well as your heels to avoid injury.
- You may also not want to use a yoga mat while you practice this pose due to the friction that it provides. Below are the tips that you can use to practice and perfect the pose. Remember this is a pose that cannot be mastered immediately unless you are a gymnast.
- Below are the steps that you should follow to master hanumanasana:
- You should first ensure that you are kneeling in a comfortable position without straining any part of your body.
- Then you should lift your foot and step a foot or so forward and you should do this in order to get away from your left knee.
- Gently you would have to outwardly rotate your right thigh. While you are doing this, you are lifting the sole that is inner and away from the floor.
- You should now rest the foot on the outer heel and on to the floor.
- Keeping your balance by using your hands firmly placed on the ground you thus move your torso forward.
- Gently slide your knee on the left to the backside and try straightening it all the time. While doing this you should decent the right of your thigh towards the floor.
- You should ensure that you stop the straightening part of your back knee and you should do so just before you reach the maximum stretch that is possible by you as a person.
- Begin pushing the right heel of yours further away as much as possible from your torso. Gently turn the front leg inward so that you are able to bring the knee cap facing the ceiling.
- As your legs straighten keep pressing your back knee towards the floor. Now, ideally your back knee should be facing the floor and the front knee facing the ceiling. Ensure you are able to get the stretch right in a slow and calculated motion.
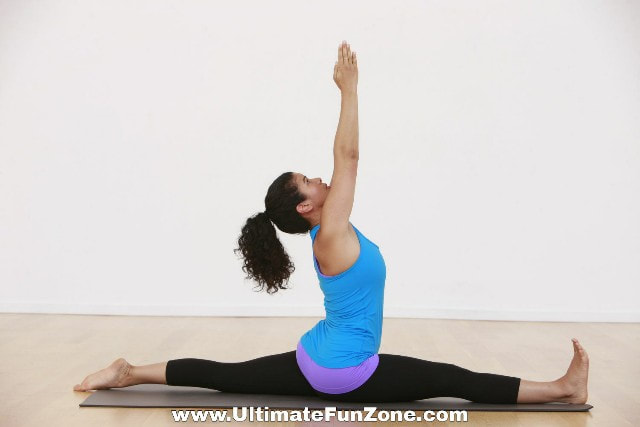
- Your rear kneecap should be pressing the floor while your front one is facing the ceiling. It is important that your legs stretch straight from your hip on both directions in the front and back.
- Once you are in this position you can bring your hands together, above your head, and pointed towards the ceiling. With proper balance you can breathe in and out in a slow and rhythmic fashion while concentrating on your breathing.
- You can practice the pose for up to a minute and a minimum of 30 seconds depending on your comfort levels. Once you are through with this you can use your hands against the floor and gently get out of the position and do the same with the other leg in front.
Benefits Of The Hanumanasana
Although this asana is a difficult one to practice and perfect it has its own benefits that come along with it. The hanumanasana is also known as the front split that we use in modern world. The benefits of this asana are as follows:
- Help you get good stretches on your groins, thighs, and hamstrings
- You can also have your abdominal organs stimulated while practicing this asana
- Your hips also end up becoming more flexible when you are able to master this asana
- Better blood flow through your body is another advantage that you derive out of this asana
In order to attain the benefits of this asana it is imperative that you do it in the right manner. You can follow the steps provided above to get the best pose while practicing hanumanasana.
Precautions To Be Taken While Doing The Hanumanasana
- Getting help from a yoga instructor is a good idea for anyone practicing the hanumanasana. It is also better if you consult your doctor to find out if this asana is ideal for your body by all means. You should only allow the split to go until you are comfortable with it and not put excessive pressure to stretch more than your comfort levels.
- In case you have suffered from a groin injury in recent times it is not advised to try or practice this asana. The same applies for people who have suffered a hamstring injury. Forcing yourself into this position can cause not just discomfort but also muscle tear and severe pain.
Conclusion
- Like all asanas that are in yoga the hanumanasana would also have to be practiced with care.
- Anyone who is not comfortable with this asana should always ensure that they practice with the help of a yoga instructor to ensure they are not faced with any injuries.
- As a beginner you should ensure that you do not push yourself and use blankets to support your knees and heels.
Share This Page On...